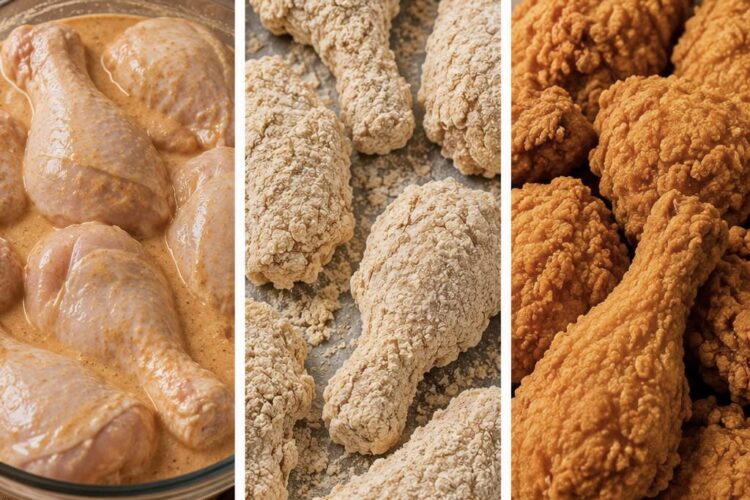
There’s nothing quite like biting into a piece of perfectly crispy fried chicken. The irresistible crunch of the golden coating, followed by juicy, flavorful meat inside, makes fried chicken one of the most loved comfort foods around the world. If you’ve ever wished you could recreate that famous fast-food style chicken at home, this recipe is exactly what you need.
This Homemade KFC-Style Crispy Fried Chicken is packed with flavor, thanks to a rich buttermilk marinade infused with garlic and spices. The secret to its incredible texture lies in the seasoned flour coating, which creates a light, crunchy crust that stays crisp while keeping the chicken moist and tender.
Whether you’re preparing dinner for your family, hosting a weekend gathering, or simply craving homemade fried chicken, this recipe delivers restaurant-quality results using simple ingredients you probably already have in your kitchen.
Why You’ll Love This Recipe
There are plenty of reasons to make this homemade crispy fried chicken instead of ordering takeout.
- Perfectly crispy and crunchy coating.
- Tender, juicy chicken every time.
- Easy ingredients found in most kitchens.
- Full of delicious herbs and spices.
- Great for family dinners, parties, or picnics.
- Can be fried or baked for a lighter version.
- Budget-friendly compared to restaurant meals.
The combination of a flavorful marinade and a well-seasoned coating ensures every bite is packed with taste and texture.
Ingredients
For the Chicken
- 1 kg chicken drumsticks or thighs
- 500 ml buttermilk (or regular milk if unavailable)
- 1 large egg
- 2 garlic cloves, finely minced
- 1 teaspoon salt
- 1 teaspoon freshly ground black pepper
For the Crispy Coating
- 300 g all-purpose flour
- 50 g cornstarch
- 1 tablespoon paprika
- 1 teaspoon garlic powder
- 1 teaspoon onion powder
- 1 teaspoon dried thyme
- 1 teaspoon dried oregano
- 1 teaspoon black pepper
- 1 teaspoon salt
- ½ teaspoon cayenne pepper (optional for extra heat)
For Frying
- Vegetable oil or another neutral frying oil
Kitchen Equipment
Before starting, gather the following tools:
- Large mixing bowl
- Shallow bowl for coating
- Deep fryer or heavy-bottomed pot
- Kitchen tongs
- Wire rack or paper towels
- Cooking thermometer (recommended)
Having everything ready before you begin makes the cooking process much smoother.
The Secret to Tender Fried Chicken
One of the biggest secrets behind delicious fried chicken is the marinade. Soaking the chicken in buttermilk helps tenderize the meat while adding subtle flavor.
The acidity of the buttermilk gently breaks down the proteins, resulting in incredibly juicy chicken once cooked. Adding garlic, salt, pepper, and egg enhances both flavor and the adhesion of the coating.
If possible, marinate the chicken overnight. Although four hours is sufficient, a longer marinating time produces even better flavor.
Step 1: Prepare the Marinade
In a large bowl, whisk together:
- Buttermilk
- Egg
- Minced garlic
- Salt
- Black pepper
Mix until everything is fully combined.
Add the chicken pieces and ensure every piece is completely coated.
Cover the bowl with plastic wrap and refrigerate for at least 4 hours. For the best flavor and tenderness, let it marinate overnight.
Step 2: Make the Seasoned Flour
While the chicken marinates, prepare the crispy coating.
In a separate large bowl, combine:
- Flour
- Cornstarch
- Paprika
- Garlic powder
- Onion powder
- Thyme
- Oregano
- Salt
- Black pepper
- Cayenne pepper (optional)
Whisk everything thoroughly so the spices are evenly distributed throughout the flour.
This seasoned coating is what gives every bite its signature flavor.
Step 3: Coat the Chicken
Remove the chicken from the refrigerator.
Lift each piece from the marinade, allowing the excess liquid to drip off slightly.
Press each piece firmly into the seasoned flour mixture.
Use your hands to press the flour into every surface of the chicken. Don’t simply dust it lightly—the thicker coating creates a crispier crust.
Place the coated chicken onto a tray.
After coating every piece, allow them to rest for about 10 minutes.
This short resting period helps the breading adhere better during frying and prevents it from falling off.
Step 4: Heat the Oil
Fill a deep fryer or heavy pot with enough oil to completely submerge the chicken pieces.
Heat the oil to 170°C (340°F).
Maintaining the correct oil temperature is extremely important.
If the oil is too hot, the coating will burn before the inside cooks.
If it’s too cool, the chicken will absorb excess oil and become greasy.
A kitchen thermometer is highly recommended for consistent results.
Step 5: Fry Until Golden Brown
Carefully lower a few chicken pieces into the hot oil.
Do not overcrowd the fryer.
Cooking too many pieces at once lowers the oil temperature and results in soggy coating.
Fry each batch for approximately 12–15 minutes, depending on the size of the chicken pieces.
The coating should become beautifully golden brown and wonderfully crispy.
The chicken should reach an internal temperature of 75°C (165°F) before serving.
Transfer the cooked chicken to a wire rack or paper towels to drain any excess oil.
Repeat with the remaining batches.
Serve Immediately
Homemade crispy fried chicken is best enjoyed while it’s still hot.
Serve it alongside:
- French fries
- Coleslaw
- Potato wedges
- Corn on the cob
- Green salad
- Mashed potatoes
- Biscuits
- Macaroni and cheese
- Barbecue sauce
- Garlic sauce
- Ranch dressing
- Honey mustard
It’s also delicious inside sandwiches, wraps, or burgers.
Tips for Extra Crispy Chicken
Want an even crunchier coating? Try these professional tricks.
Double coat the chicken by dipping each piece back into the marinade before coating it in flour a second time.
Allow the breaded chicken to rest before frying.
Keep the oil temperature consistent throughout cooking.
Avoid overcrowding the fryer.
Drain cooked chicken on a wire rack instead of stacking it on paper towels to preserve maximum crispiness.
These simple techniques make a noticeable difference in the final texture.
Oven-Baked Alternative
If you’d like a lighter version, you can bake the chicken instead of frying it.
Preheat your oven to 200°C (400°F).
Arrange the coated chicken on a baking tray lined with parchment paper or placed on a wire rack.
Lightly spray the chicken with cooking oil.
Bake for approximately 35–40 minutes, turning once halfway through cooking.
Although baked chicken won’t be quite as crispy as fried, it will still develop a delicious golden crust with much less oil.
Storage Tips
Leftover fried chicken stores surprisingly well.
Place cooled chicken in an airtight container and refrigerate for up to 3 days.
For longer storage, freeze for up to 2 months.
To reheat, bake in a 190°C (375°F) oven for about 15–20 minutes until heated through.
Avoid microwaving whenever possible, as it softens the crispy coating.
Frequently Asked Questions
Can I use chicken breasts?
Yes. Simply cut large chicken breasts into smaller pieces and reduce the cooking time slightly to avoid overcooking.
What can I use instead of buttermilk?
Regular milk works well. You can also make homemade buttermilk by mixing one tablespoon of lemon juice or white vinegar with 500 ml of milk and letting it sit for 10 minutes.
Why add cornstarch?
Cornstarch helps create a lighter, crispier coating that stays crunchy longer than flour alone.
Can I make it spicy?
Absolutely. Increase the cayenne pepper or add chili powder, hot paprika, or your favorite spicy seasoning blend.
How do I know when the chicken is fully cooked?
The safest method is using a meat thermometer. The internal temperature should reach 75°C (165°F).
Final Thoughts
This Homemade KFC-Style Crispy Fried Chicken is everything you want in a classic fried chicken recipe—crispy, flavorful, juicy, and incredibly satisfying. The buttermilk marinade keeps the meat tender, while the perfectly seasoned coating delivers the signature crunch that everyone loves.
Whether you’re making it for a casual weeknight dinner, a family celebration, or a game-day feast, this recipe is guaranteed to impress. Pair it with your favorite sides, experiment with different dipping sauces, and enjoy restaurant-style fried chicken made fresh in your own kitchen.
Once you try this homemade version, you’ll discover just how easy it is to create irresistibly crispy fried chicken that’s every bit as delicious as your favorite takeout.